Official Configuration Guide for Integrating DeepSeek Harness with B.AI API
DeepSeek Harness is a highly anticipated open-source AI workspace application, currently in the developer preview phase. It not only assists with code and file analysis within local workspaces but also grants developers tremendous flexibility through an open custom Provider mechanism. Meanwhile, as advanced AI infrastructure, B.AI has built a full-stack large model service platform that integrates high availability and low latency, dedicated to building a powerful, stable, and highly elastic intelligent computing power network for developers and enterprises.
This guide will demonstrate in detail how to start DeepSeek Harness from scratch in Windows, macOS, and Linux environments, and successfully integrate it with the B.AI API. By following this tutorial, you will establish an end-to-end invocation pipeline from your local workspace to large models, fully unlocking the productive and innovative potential driven by AI.
Final call chain achieved: DeepSeek Harness → B.AI API → Models provided by B.AI
1. Prepare Environment
DeepSeek Harness is launched via npx included with Node.js. Please ensure your system has the latest available Node.js LTS version installed.
Official download link: https://nodejs.org/en/download
Windows
You can directly download the .msi installer, or search for PowerShell in the Start menu, open it, and run the WinGet installation commands.
winget --versionwinget install --id OpenJS.NodeJS.LTS -e --source winget
macOS
On the Node.js official download page, select the macOS Installer, download the .pkg file, and follow the prompts to complete the installation. After installation, press Command + Space to open Spotlight Search, type Terminal, and enter the terminal.
Linux
On the Node.js official download page, select your specific Linux distribution and system architecture, and follow the package manager commands provided on the page to install the LTS version. Since installation commands vary across distributions like Ubuntu, Debian, and Fedora, it is recommended to use the dynamically generated commands from the official page to ensure a smooth installation process.
After installation, close all currently open terminal windows and reopen a new terminal (Windows users should use PowerShell, macOS users should use Terminal, and Linux users should use their system terminal).
Run the following set of verification commands across all three systems:
node -vnpm -vnpx -v
If all three commands return version numbers, your environment is ready.
Node.js v24.19.0npm 11.17.0npx 11.17.0
If you plan to build and run the project from GitHub source code, you will need a Git environment. First, run `git --version` in the terminal to check if it is installed. If not, execute the following commands based on your operating system:
Windows
winget install --id Git.Git -e --source winget
macOS
xcode-select --install
Ubuntu 或 Debian
sudo apt updatesudo apt install git
Note: If you only plan to quickly experience and configure B.AI using the npx method, you can skip Git entirely.
2. Launch DeepSeek Harness Using npx (Recommended)
For regular use and configuring the B.AI API, it is recommended to launch directly via npx.
Run the following command in the terminal (works across all three platforms):
npx @deepseek-ai/dsh web
First-time run prompt: The system will ask if you want to download the required package. Type `y` and press Enter to confirm.
Need to install the following packages@deepseek-ai/[email protected] to proceed? (y)
If you encounter a dependency deprecation warning during startup, this is normal and requires no intervention.
npm warn deprecated [email protected]
When the terminal outputs the local address, it indicates that the DeepSeek Harness Web service has successfully started.
dsh web: http://127.0.0.1:3080
Keep the terminal window open, then enter the following in your browser's address bar:
http://127.0.0.1:3080
This address is only accessible locally. Closing the terminal window or pressing Ctrl+C inside it will stop the local service. If your browser cannot open 127.0.0.1:3080, first check if the terminal is still running and verify whether the aforementioned dsh web address has been output. If necessary, rerun the launch command.
npx @deepseek-ai/dsh web
3. Source Code Build Method (Advanced)
If you plan to develop plugins, modify the source code, or participate in project development, you can also obtain the source code from the official GitHub repository.
Official Repository: https://github.com/deepseek-ai/deepseek-harness
Please note that GitHub provides the project source code. After downloading, you must complete dependency installation and project building via the terminal; you cannot run it by simply double-clicking files. You can obtain and run the source code using either of the following two methods:
Method 1: Download ZIP Source Package On the repository page, click the green Code button and select Download ZIP. After downloading and extracting, open the terminal, use the cd command to navigate into the extracted project directory, and run the following commands sequentially:
npm install -g pnpmpnpm installpnpm run buildpnpm dsh web
Method 2: Clone Using Git It is recommended to first run `git --version` to check if the Git environment exists. If not installed, refer to the "Prepare Environment" section above to complete Git installation for your respective system. Once the environment is confirmed, reopen the terminal and run the following commands:
git clone https://github.com/deepseek-ai/deepseek-harness.gitcd deepseek-harnessnpm install -g pnpmpnpm installpnpm run buildpnpm dsh web
Regardless of whether you use the ZIP or Git method, once the build and launch are successful, the access address will be http://127.0.0.1:3080.
4. B.AI Custom Provider Configuration
Step 1: Skip Official Default Configuration
Upon first entering DeepSeek Harness, the system will display a pop-up window prompting you to fill in the API Key for official models. Be sure to click "Configure Later". If you enter the B.AI Key here, the system will fail to recognize it correctly.
Step 2: Access the Custom Configuration Page
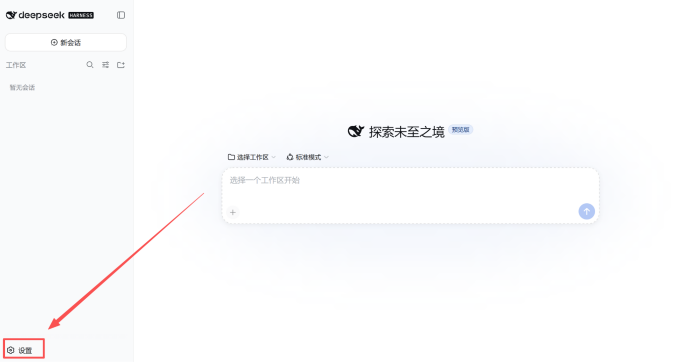
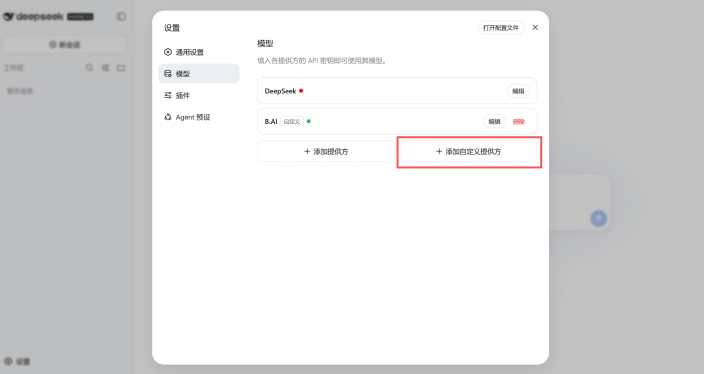
Click "Settings", at the bottom left corner of the page, select "Models" from the left menu, and click "Add Custom Provider" on the right. Note: At this stage, a red dot appearing next to the official Provider is a normal state and does not affect subsequent operations.
Step 3: Fill in B.AI Interface Information
After opening the custom provider setup, fill in the details as follows:
Provider ID baiDisplay Name B.AIAPI Endpoint https://api.b.ai/v1API Protocol openai-completionsAPI Key Valid API Key created from the B.AI dashboard
Step 4: Fetch Model Directory and Complete Provider Creation
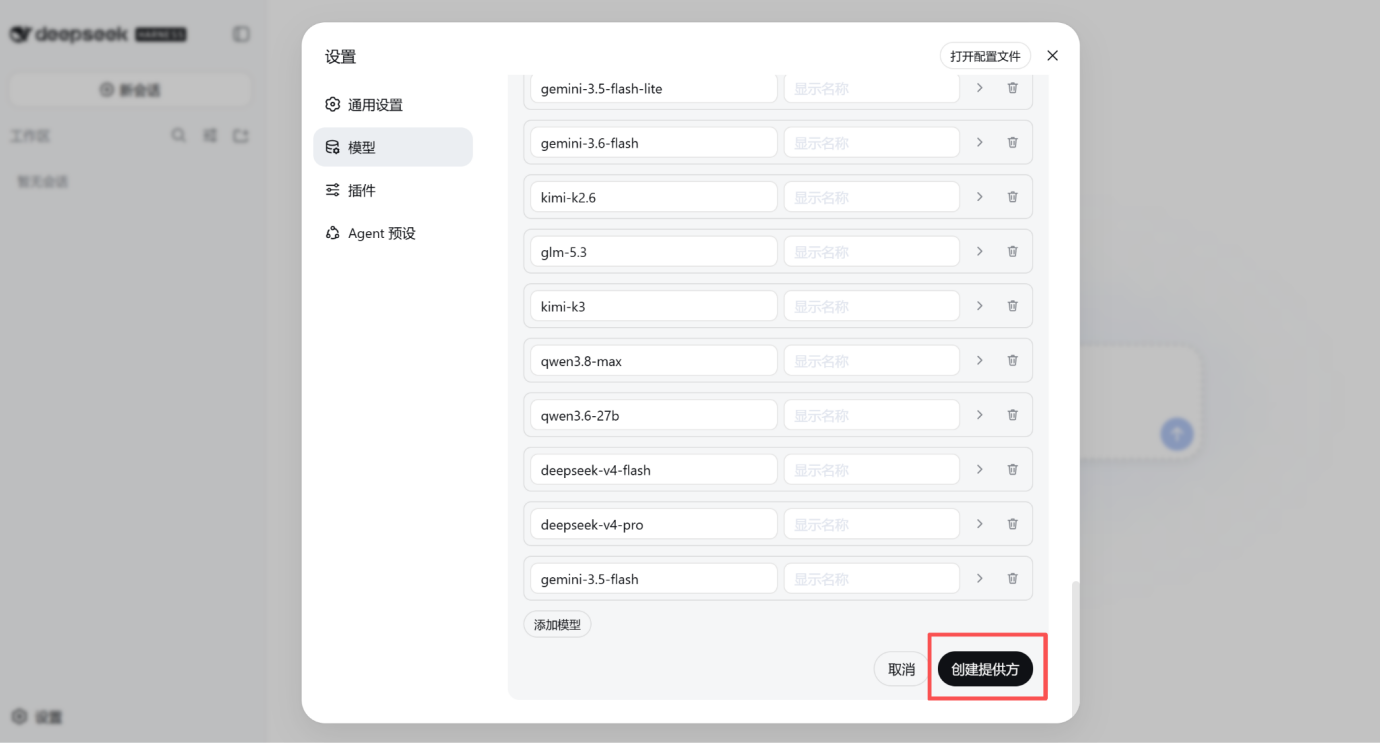
After filling in the basic information, scroll down to the "Model Directory" section. The system offers two ways to add models: click "Add Model" to manually enter the model ID, or click "Fetch Available Models" in the top right corner.
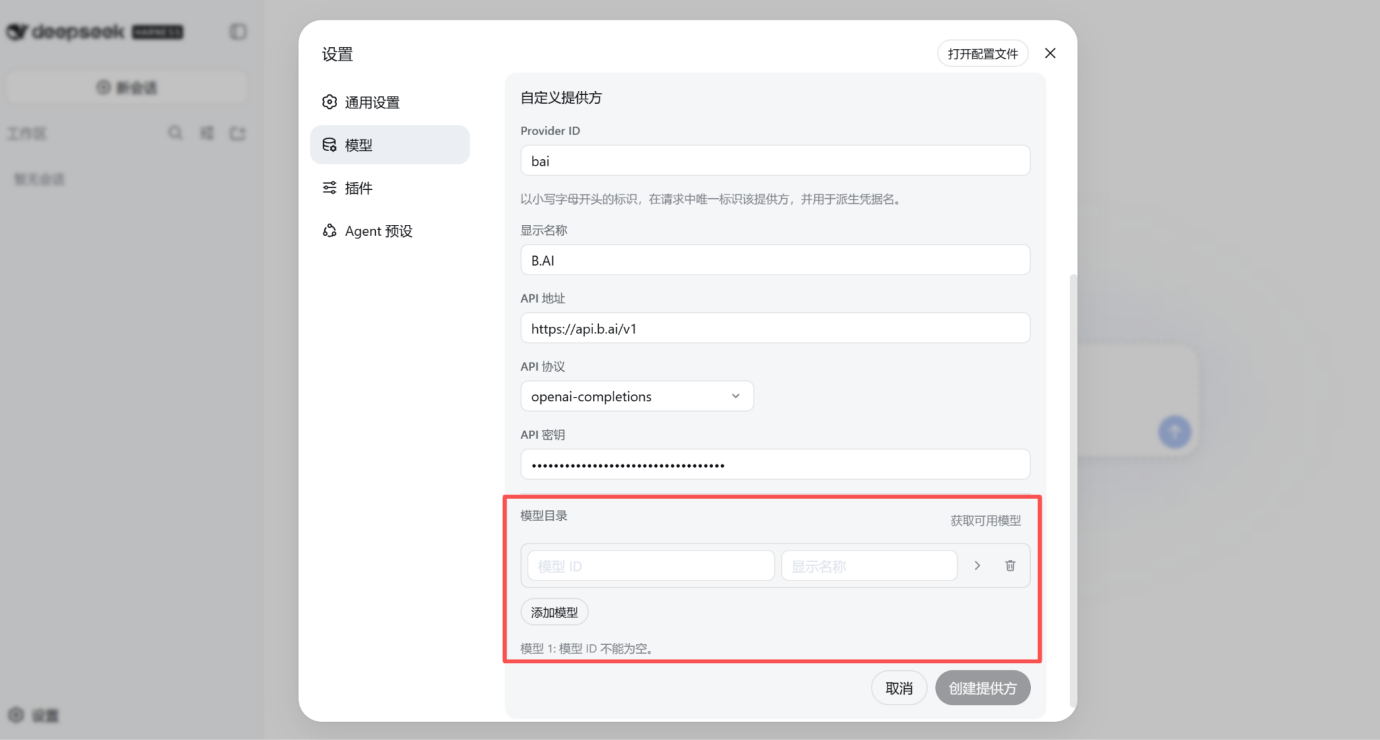
Recommended action: Preferably click "Fetch Available Models". Let DeepSeek Harness directly request the model directory available to your current account from B.AI. If the model list returns normally, it proves that the configurations for the B.AI API Key, https://api.b.ai/v1, openai-completions protocol, and model directory endpoint have been successfully connected.
Notes on model selection and addition:
- In the returned list, select the DeepSeek models currently available on B.AI (examples include deepseek-v4-flash or deepseek-v4-pro. Please note: specific available models may change dynamically based on account permissions and time; always rely on the actual returned results).
- Do not modify the Model ID: The Model ID must exactly match the directory actually returned by B.AI. Do not arbitrarily change any capitalization, hyphens, or version numbers, as this will easily trigger a "model not found" error during subsequent calls.
After confirming the models are added correctly, scroll to the bottom of the form and click "Create Provider".
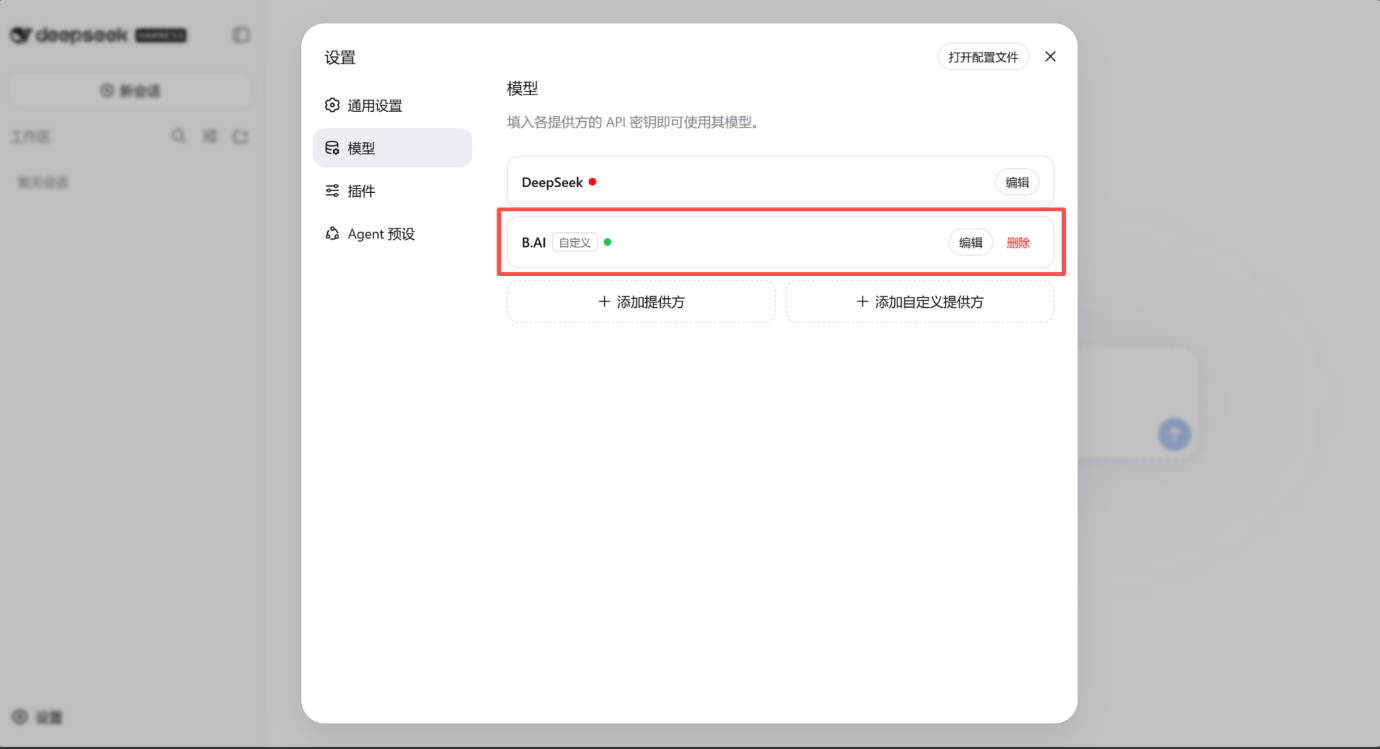
Upon successful creation, a new custom Provider named B.AI will appear on the settings page, accompanied by a green dot. This indicates that the B.AI custom Provider has been successfully saved and is active. Note: If the official DeepSeek Provider still shows a red dot at this time, it is because the official DeepSeek API Key has not been filled in. This does not affect the normal use of the B.AI interface indicated by the green dot.
Step 5: Connectivity Verification
Close the settings window, return to the main interface, and create a new session. Select the B.AI Provider in the model selector, then choose the newly added DeepSeek model, and perform the following tests:
Basic Conversation Test: With B.AI and the corresponding model selected in the model selector, send the following prompt:
Please introduce yourself and specify which model you are currently using.
Observe whether it returns content normally, supports streaming output, and verify that the current Provider is B.AI and the Model ID matches your selection.
Tool Invocation Test: Send a read-only command to verify the tool pipeline:
Please review the files in the current workspace and summarize the directory structure. Do not modify or delete any files.
The prompt explicitly emphasizes "do not modify or delete any files" to safely and quickly verify that Harness's tool invocation pipeline is functioning properly without altering the current workspace.
While performing these two tests, please check the terminal window where DeepSeek Harness is running to ensure no 401, 404, model not found, or other request error messages appear in the console. If the terminal runs smoothly, you have successfully completed all integration and verification steps.
Frequently Asked Questions (FAQ)
Q1: The terminal prompts that node, npm, or npx commands are not found?
A: This usually means Node.js has not been fully installed, or the path for the newly installed commands has not yet been recognized by the current terminal. Close all terminal windows, reopen them, and try again.
node -vnpm -vnpx -v
If the commands are still not found, go back to the Node.js official download page and confirm that you have installed the current LTS version. Windows users can also check Node.js in the system's "Installed Apps", while macOS and Linux users can run which node to view the command path.
Q2: An "npm warn deprecated" message appears during startup. Do I need to handle it?
First, check if the following address appears afterward:
dsh web: http://127.0.0.1:3080
If this address displays normally, it means the Web service has successfully started.deprecated is merely a dependency deprecation warning and can be ignored for continued use. If the terminal subsequently crashes abnormally or fails to output the local address, please troubleshoot further based on the specific error messages at the end of the terminal.
Q3: My browser cannot open 127.0.0.1:3080. What should I do?
A: First, check whether the terminal window running dsh web is still open. Closing the terminal or using the Ctrl+C shortcut will terminate the local service.
If the service has stopped, rerun the launch command:
npx @deepseek-ai/dsh web
If the terminal indicates "port is occupied": please terminate any leftover DeepSeek Harness processes first, and then retry.
Q4: How do I troubleshoot when encountering a 401 Unauthorized error while calling the model?
A: A 401 error typically points to API Key authentication failure. Please check:
- Whether the API Key was copied completely, with no extra spaces at the beginning or end.
- Whether the API Key is in an active (not disabled) state in the B.AI dashboard.
- Whether the Key was entered into the correct configuration field: Do not enter it into the initial pop-up's "Official DeepSeek Provider"; instead, it must be placed in the B.AI interface under "Settings → Models → Add Custom Provider".
Q5: Encountering a 404 Not Found error when calling the model. Where is the mistake?
A: Please verify that the API address is filled in completely.
https://api.b.ai/v1
Q6: How do I resolve the "model not found" prompt?
A: Return to the editing page for the B.AI Custom Provider and click "Fetch Available Models" again. Ensure that the selected or entered Model ID exactly matches the system's returned result, strictly preserving all capitalization, hyphens, and version numbers. Additionally, changes in account permissions or official model directory updates may render old models unavailable. If you encounter an error, always rely on the currently re-fetched model list.
Q7: The B.AI status shows a green dot, but I still cannot chat?
A: The green dot only indicates that the configuration information has been saved. If you cannot chat, please confirm that the current session has correctly selected the B.AI Provider and the corresponding specific model, that the Model ID is accurate, and that your B.AI account has the necessary permissions and available quota for the chosen model. Afterwards, perform targeted troubleshooting based on the final error code in the terminal (e.g., 401/404)
Q8: Will the access pages differ between Windows, macOS, and Linux systems?
A: The environment preparation differs slightly across the three systems. However, after launching dsh web, all systems access http://127.0.0.1:3080 via a browser, and the steps for adding the B.AI Provider, fetching models, and verifying conversations are essentially identical.
Reference Links:
- Node.js Official Download Page:https://nodejs.org/en/download
- DeepSeek Harness Official Repository:https://github.com/deepseek-ai/deepseek-harness
- B.AI API Documentation:https://docs.b.ai/llmservice/api/